The microscope parts discussed here are of a compound microscope. A simple microscope has just a lens, stage, and light source.
But a compound microscope has many parts like
- Eyepiece
- Body Tube
- Revolving nosepiece
- Objective lens (Three 10x, 45x, 100x)
- Coarse adjustment
- Fine adjustment
- Arm/handle
- Rack stop
- Fixed stage
- Mechanical Stage
- Clips
- Side-ward movement knob
- Front and back movement knob
- Condenser and Diaphragm
- Mirror (convex and concave mirror)
- Base
- Pillars
Parts of Microscopein detail
A compound microscope has about 15 parts that assist in viewing with a naked eye, a sample holder, a magnifying lens, and a light source.
For the convenience of study, we can divide them based on their purpose in the instrument like
A) Parts that assist in viewing the object
B) Part that helps in the adjustment of lenses for a clear view
C) Part that provides sufficient light on to the object to be seen
D) Parts that support holding the sample and others.
However, we will study their details based on their location on a compound microscope from top to bottom for ease of study.
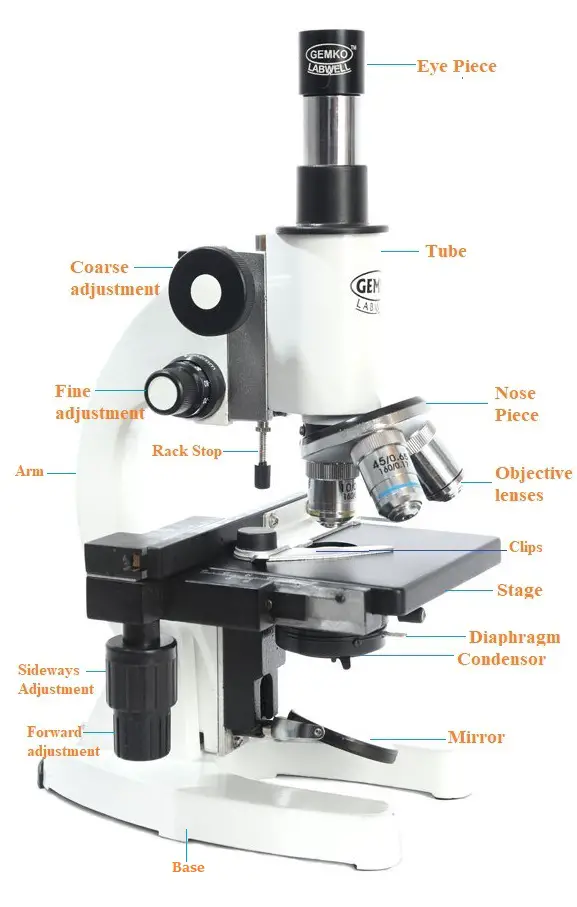
1. Eyepiece
- It is the first part what the eye encounters when viewing an object in the microscope from the top.
- It is removable and has two glass lenses and an eyepiece tube.
- One of the eyepiece lens is at the top of the tube while the other is at bottom of the tube.
- The upper lens of eyepiece is flat, while the other at the bottom i.e. towards the object is slightly convex.
- The convex lens at the bottom helps to magnify the image, and in most cases, the magnification power of this lens varies by manufacturer as 5X, 10X, or 15X.
- Through these transparent glass lenses, one can see the object clearly.
- When needed, one can remove the eyepiece and wipe it with a cloth to free it from dust particles and put back into the tube column.
Body Tube
- It is a long columnar-shaped tube that holds the eyepiece and also the nosepiece, including the objective lens.
- It holds the nose piece immediately to the end to which objective lenses are fixed.
- It has rulings that help move it up and down to get a clear view of the object.
Revolving nosepiece or Revolving turrete
- It is a circular metallic piece holding the magnifying lenses to the tube.
- It revolves freely around its hinge so that the required lenses needed to focus.
Objective lens
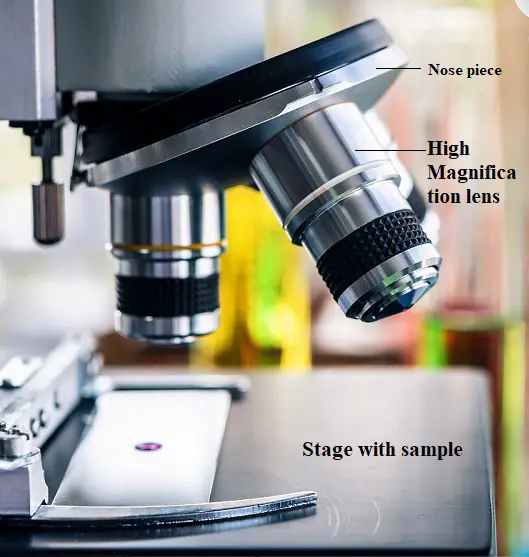
- These are the lenses that help to magnify the objects on the slide placed on the stage.
- The resolutions most common are 10x, 45x, and 100x with 10x having the lowest magnification power and 100x having the highest magnification power.
- These three eyepieces can be removed and replaced if required.
Focus Knobs
The binocular microscope has two focus knobs
Coarse adjustment (Coars focus)
- This is an adjustment knob present at the junction of the arm and the tube.
- Its size is quite bigger than the focus knob.
- It is routinely used for rough adjustment and helps to have a rough view of object on slide.
- One can adjust the eyepiece till it reaches the slide but not touch it.
- From there, fine adjustment can be used to get a clear resolution.
Fine adjustment (Fine Focus knob)
- This is a smaller and circular knob seen below the coarse adjustment knob. It is fixed to the arm of the microscope.
- It helps to adjust the magnification lens so as to focus for better resolution. Its movement is slow and fine.
- This fine focus knob is essential besides the coarse knob for easy and precise focus.
- Also, the chances of damage to the sample slide on the stage are eliminated due to this knob.
Arm or Handle
- It holds the eyepiece, objective lens, stage, and light source in a straight line.
- It is also useful to carry the microscope from one place to another.
Rack stop
- This small threaded pin helps to fix the column tube at a particular height after being adjusted to the desired height by the adjustment knobs.
- Once the adjustment of height is made, the rack stop is tightened to hold the tube at the set height.
- The rock stop has to be loosened to further decrease or increase the height.
Fixed Stage
- It is the place where the slide containing the test sample is placed for evaluation.
- It is a square-shaped metallic plank consisting of 2 clips on the top and 2 adjustment knobs.
- The clips help to hold the slide in place. While, the knobs help in side-wise movement or forward and backward movement.
- The stage is always kept clean during and before the start of experimentation.
- The stage has an orifice through which light from the mirror falls on the slide. This light helps in the visualization of the microscopic sample.
Mechanical stage
- As the name indicates, this is movable and has clips to hold the slide.
- This mechanical stage has fine calibrations, as shown in the image above.
Clips
- As mentioned before, these are two metallic holder presen on stage. They help in fixing the slide in a specific spot on the stage.
- Due to this, once the sample is focused clearly, there is no chance of accidental movements.
Side-ward movement knob
- This know is located over or below the stage based on the design.
- It helps to move the slide toward the left or right direction when you need to have a clear view of the sample through the lens.
Front and back movement knob
- This is another knob situated on the stage and controls forward and backward movements of the slide.
- Without these knobs, it would be hard to visualize the viewable fraction of the sample.
Condenser & Diaphragm
The condenser
- It is located below the stage and is set fixed under the stage and can be lowered.
- The function of the condenser is to convert the parallel rays of the light reflected from the iris diaphragm into a cone.
- The condensed beam of light passes through the aperture of the fixed stage and falls on the slide.
Iris-diaphragm
- This is present below the condenser and consists of a dark-colored shutter which is a movable cover.
- This shutter can be opened and closed with a side knob to control the amount of light falling on the sample over stage.
- It helps gather light from the mirror and focus it on the stage.
- The diaphragm is closed for low light intensity, while for more intensity is kept wide open.
Mirror (convex and concave mirror)
- This is fixed to the base below the diaphragm. It is meant to reflect parallel rays of light into the condenser towards the stage.
- On one side, it has a convex lens and, on another side, a concave lens. This is present in older microscopes without artificial illumination.
- The mirror can be rotated and fixed at any angle to help light fall onto the stage.
Base
- This is the base of the microscope over which the entire instrument’s weight rests.
- It is heavy and flat, linked to the arm.
Pillars
- These are the erect pillar that emerges from the base and provides a hinge to hold the arm of the microscope.
Frequently asked questions and answers
Which part of an optical microscope contains a magnifying lens
The nose piece and eye piece of the microscope contains magnifying lenses.
What is the purpose of the stage clips
Stage clips help to hold the sample slides on to the place and move for better view.
How to properly hold a microscope
Microscope should be held at the arm as shown in the image. This way, there are less chances of dropping it accidentally.
When focusing a specimen you should always start with the
Bring the nose piece lens down such that it touches the specimen. Then seeing though the eye piece, raise the lens using fine or coarse adjustment to get the sample view.

I found this really helpful for my school projects. thank you so much!
@Karina, glad that you found it helpful.
Great learning! Very interesting!